FaceFusion is a next generation face swapper and enhancer. It can face swap both still images and videos through multiple different face swapping models. In this guide, we’ll go through how it works, all the settings and how to achieve a good result. This is an indepth guide from the video here: https://youtu.be/QU2inl3mobs

Installation Windows
Python
winget install -e --id Python.Python.3.10
PIP
python -m ensurepip
GIT
winget install -e --id Git.Git
FFmpeg
winget install -e --id Gyan.FFmpeg
Reboot your system in order for FFmpeg to function properly.
shutdown /r
If you have issues with FFmpg errors, follow these extra steps:https://www.wikihow.com/Install-FFmpeg-on-Windows
Toolset
Microsoft Visual C++ 2015 Redistributable
winget install -e --id Microsoft.VCRedist.2015+.x64
Microsoft Visual Studio 2022 build tools
During installation, ensure to select the Desktop Development with C++ package.
winget install -e --id Microsoft.VisualStudio.2022.BuildTools --override "--wait --add Microsoft.VisualStudio.Workload.NativeDesktop --includeRecommended"
Installation MacOS
Python
brew install [email protected]
PIP
python -m ensurepip
GIT
brew install git
FFmpeg
brew install ffmpeg
Installation Linux
Python
apt install python3.10
PIP
apt install python3-pip
GIT
apt install git-all
cURL
apt install curl
FFmpeg
apt install ffmpeg
Open a terminal window/command prompt by typing cmd in start menu.

git clone https://github.com/facefusion/facefusion

Go into your newly created FaceFusion folder.
cd FaceFusion

Start your virtual environment
python -m venv venv
venv\Scripts\activate.bat

Install the dependencies.
python install.py

Select default if you don’t know your hardware.
Select CPU for no GPU.
Select cuda for Nvidia GPU.
Select rocm for AMD GPU.

Select cuda for NVIDIA GPU. Else, select default.

Install Cuda Toolkit.
https://developer.nvidia.com/cuda-11-8-0-download-archive
Run Facefusion.
python run.py
OPTIONAL: Gold Edition install (FaceFusion supporters only)
The FaceFusion Gold package is a paid option available from FaceFusion Discord https://join.facefusion.io
Extract the Gold Edition package to your facefusion folder.

Open command prompt and navigate to your facefusion folder.

To activate your virtual environment write venv\Scripts\activate.bat and press enter.

Write python gold.py and press enter.

Move with arrows up/down, select options you want to install with spacebar and press enter.

After installing run normally writing python run.py and press enter.
OPTIONAL: See bottom of document for Gold package install (FaceFusion paid supporters only)
How to use FaceFusion
Basic interface:
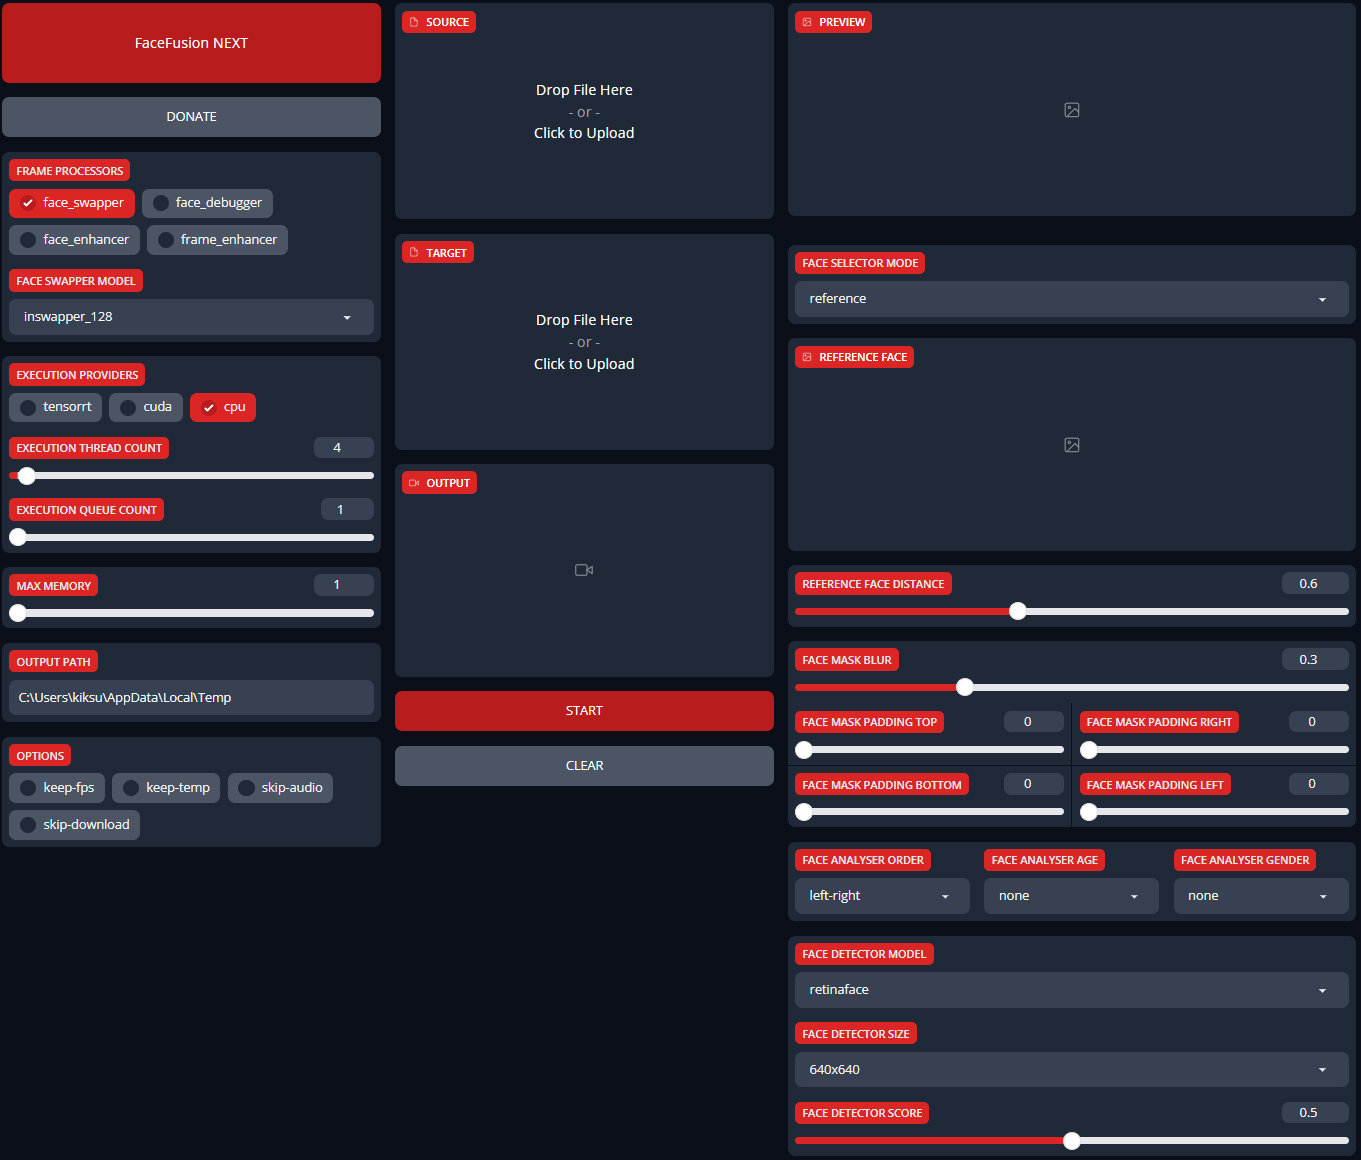
FaceFusion interface might look a bit frightening at first but don’t you worry my friend.
Let’s go through the initial steps and basic workflow you need to do to get a simple face swap done and after that we take a look at the rest of the settings settings and some extras.
First thing you want to do is to change your output path.
This is where your finished files save after processing.

Second thing you need to do is choose your execution provider.
By default only cpu option is activated.
Now activate the execution provider you selected while installing FaceFusion.
This example uses a NVIDIA GPU so cuda is activated in here and if you have installed NVIDIA’s TensorRT you want to select tensorrt too.

Then we can start with the basics.
Choose a face swapper model you want to choose. Depending which version you have installed you might have different models shown here.

There are few different swapper models which use different methods for recognizing the faces. Numbers after the model name represent the resolution of the model.
When a model is selected FaceFusion will download that automatically (this can be skipped from options, more of this later).
Drag and drop or click and select a photo of a face in the source box which is located top center of the interface.
Source is the face you want to change to the target photo or video.
In this example the source face is an image of a blonde woman portrait generated with Stable Diffusion. The source image should be a reasonably good image or photo straight from front to get the best possible result.

Below the source box is the target box.
Drag and drop or click and select a photo or a video in the target box.
The target is the photo or video where you want to replace a face.
In this example the target video is stock footage video of a redhead woman.

After you have dropped both images or video FaceFusion starts immediately analyzing the material and soon you will see a couple changes in the interface.
On the top right you will see a preview box where the face should be replaced.
From the preview frame slider you can select the frame you want to see or you can write the exact frame in the box showing a current frame number.

Under the preview box is frame trimming.
Adjusting the sliders or writing the frame numbers you can trim frames from the beginning of the video or from the end of the video. This will cut the output video length to the frame count between these values.
Below the preview is face selector mode and reference face box.
In this case there is only one recognized face in the target video as you can see here.

If there are multiple faces in the target you will see all the recognized faces like this.

When multiple faces are recognized and selector mode is on reference you can choose one face to swap. When selector mode is on many, all detected faces will be swapped.
If you don’t see a reference face in the field at all there are no recognized faces. You might need to change some of the detector settings or possibly even change the target image.
Also it’s important to keep an eye of the console window where you see if there are errors with face recognition or overall when processes are running.
For example in this case the model couldn’t recognize any faces in the source image and after tweaking some settings the swap succeeded.

In the console window you see the process running and there is quite a lot of information.
There are target video frame rate 25 FPS, progress bar, frame count of the target video or the amount of selected frames in the trimmed section.
Used time < time estimation, frames processed per second, memory usage and execution provider settings used for this particular process.

If you wish to change source image or target image/video you need to clear the old one from the X -button marked here.


There you go, these are the basic steps of using FaceFusion.
Next we take a look at more settings you can tweak if needed.
Face enhancer
Usually you want to use the enhancer especially if you have used a lower resolution model and/or the target face is relatively big. If the face is small or the photo is low resolution you might not need an enhancer at all.
Same way as with the swapper models, when an enhancer model is selected it will be automatically downloaded.
Experiment with different models. Depending on the installed version there might be differences which models you have here.

Face debug
Face debug option lets you see how well the face is recognized.
In this example all the important anchoring points are recognized correctly.

Frame enhancer
Frame enhancer is basically upscaler, it upscales the resolution the selected amount and enhances the quality too.
This is a process that can take a long time depending on your hardware and selected upscaling model.

Face detector model
Here you can choose the detector model which is used to detect faces.


Retinaface is a better model, yunet is faster but not as good. If you get problems with recognition you might need to change to a different resolution.
Like mentioned earlier, keep an eye of the console window to easily see if the model can’t recognize any faces. Of course you can see this also in the preview if the face is not swapped there.
Face detection score, face analyser and reference face distance
With these settings you can adjust how the detection and analyser works.
If you have a target which has multiple faces, face detection score lets you adjust how good quality faces are detected and you can see the result in the reference face box.
Higher value means better quality faces are detected.

Analyser options
Again with multiple faces you can set different analyser options.


The analyser order makes selecting faces in the reference face box easier if you have an image with a big group of people like shown earlier. If bottom-top is selected the more clear faces will be shown on top.

You can also choose the age group and gender what kind of faces you want to be detected.
Reference face distance
With this setting you can set a threshold, how similar faces are detected when you have selected the face you want to swap. This is shown in the preview with face debugging on.
In this example the man with glasses is selected and with reference face distance at value 0.9 only the near similar faces are detected.


Mask blur and padding

Mask blur sets the amount of swapped face blurring from the rectangle’s sides to inwards like shown in this example.
Blur 0, blur 0.6, blur 1


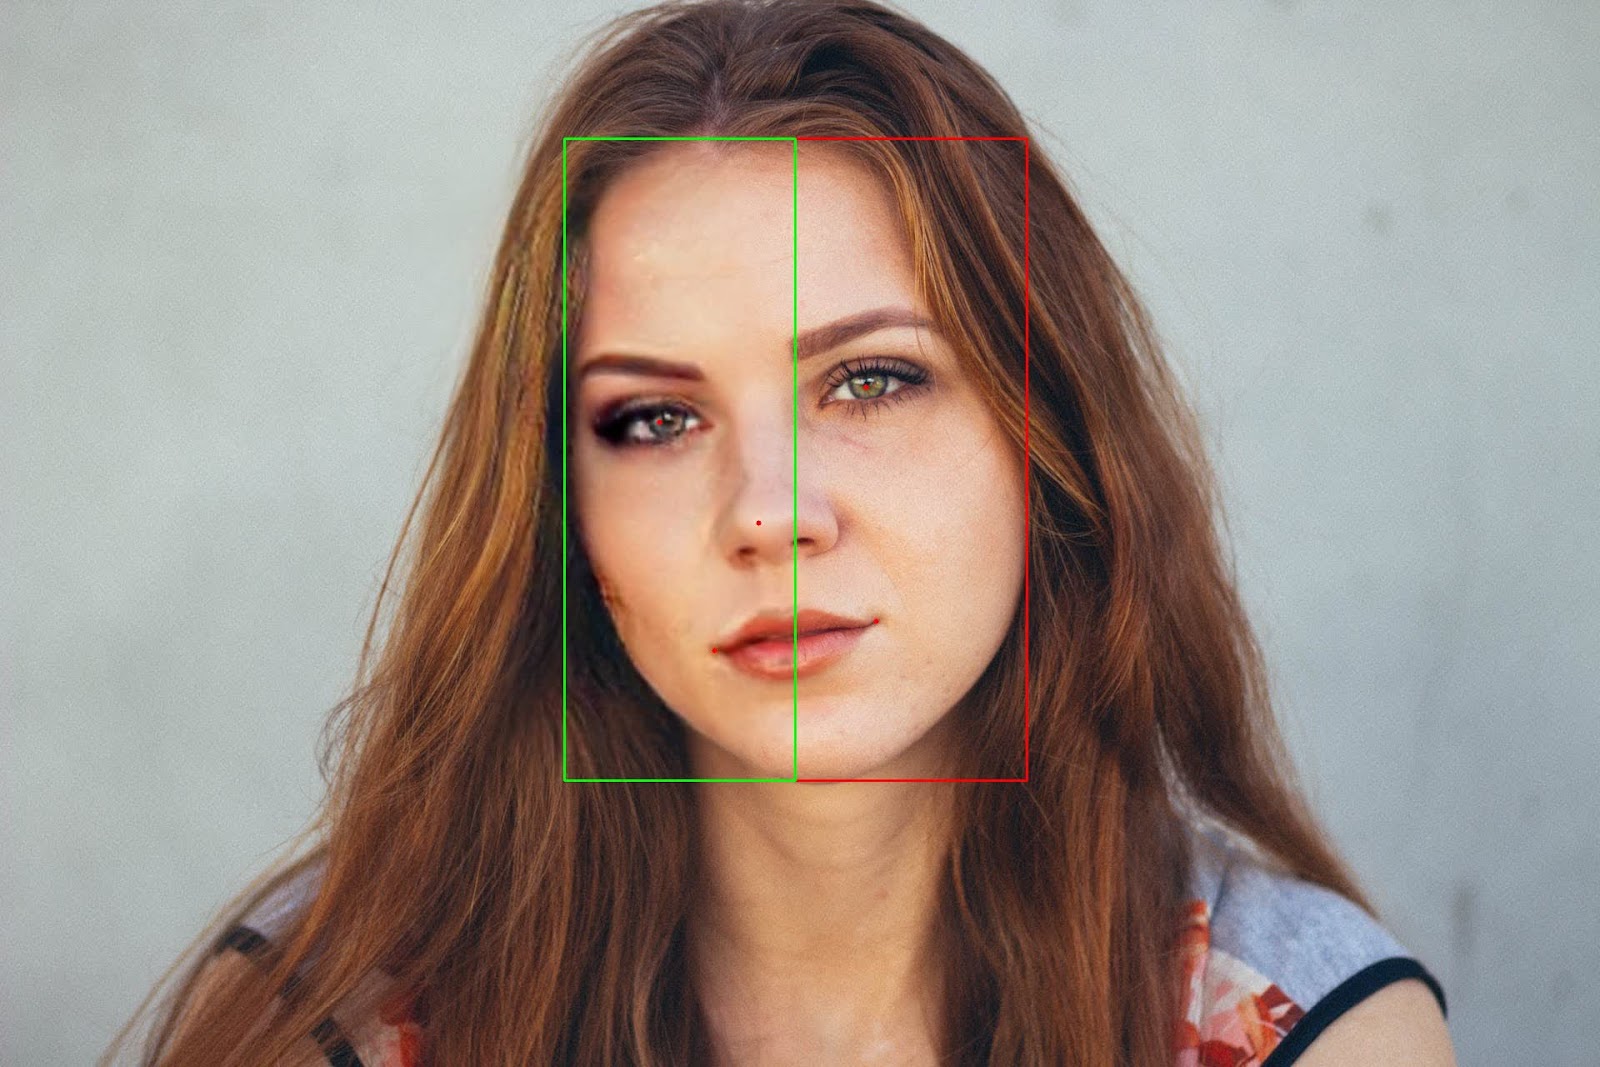
Mask padding lets you tune the swapped face area from different directions, again from the rectangle’s sides to inwards.
In this example mask padding right is set to 50 and only the left side of the face is swapped.
If you have dropped a video to the target box you have some extra options.
Temp frame format and temp frame quality
When the video is processed FaceFusion breaks it to temporary images getting ready to be swapped and from these frames video is stitched back together.
Optimal setting for the best quality is of course to set this to maximum value.
For the file format you can use what you like.

If you want to keep these temporary frames you have an option keep-temp for that.
Keep-fps keeps the original fps of the video, otherwise the default output fps is 25. Skip-audio discards the audio from the video.
Skip-download prevents the models to be downloaded automatically when they are selected from the menus.

Output video encoder and quality
Choose a video encoder of your liking. Experiment with what suits you the best because there are differences in speed and quality for example. More info of codecs here.
https://en.wikipedia.org/wiki/Comparison_of_video_codecs#Codecs_list
Output video quality is self explanatory, higher value, better quality. A good default recommendation is h264_nvenc

For advanced users only
With these settings you can speed up frame processing but you want to be careful if you don’t know what you’re doing.
Execution thread count
Control how many threads run in parallel to process the frames.
Execution queue count
Control how many frames are processed per thread.

Max memory
Maximum allowed RAM usage for the frame processing.

Examples of swapper model results - image
Image target, GFPGAN 1.4 face enhancer, blend value 100
Inswapper_128 (and fp_16 version, the result is the same, fp_16 is faster)

Blendface_256

Simswap_256

Simswap_512

Ghost Unet Models comparison:
Image target, GFPGAN 1.4 face enhancer, blend value 100
Ghost_unet_1_block

Ghost_unet_2_block

Ghost_unet_3_block

Examples of swapper model results - video
Video target, GFPGAN 1.4 enhancer, blend value 80
Inswapper_128 (and fp_16 version, the result is the same, fp_16 is faster)
<inswapper_128 - gfpgan_14.mp4>
Blendface_256
<blendface_256 - gfpgan_14.mp4>
Simswap_256
Simswap_512
All combined in one video:
OPTIONAL: Gold Edition install (FaceFusion supporters only)
The FaceFusion Gold package is a paid option available from FaceFusion Discord https://join.facefusion.io
Extract the Gold Edition package to your facefusion folder.
Open command prompt and navigate to your facefusion folder.
To activate your virtual environment write venv\Scripts\activate.bat and press enter.
Write python gold.py and press enter.
Move with arrows up/down, select options you want to install with spacebar and press enter.
After installing run normally writing python run.py and press enter.
Extras in Gold Edition
Gold/orange theme

Ghost unet swappers models

Target url video download

Narrow progress bar

Using target url video download
You can see all the supported sites here https://github.com/yt-dlp/yt-dlp/blob/master/supportedsites.md.
Copy and paste the video url in the field and click download.

You can see the download process in the console window.

After downloading, use it like a normal video swap.
Create a clickable start icon
I have created a startfacefusion.bat file that you can put in your facefusion folder next to the run.py file. If you place this in your folder, you can doubleclick startfacefusion to start it without starting it from the terminal. You can also right click drag this to your desktop and make a shortcut to double click. Download the .bat file from the bottom of this guide.


